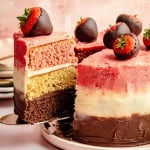
Neapolitan Cake
Gorgeous Neapolitan cake with perfect chocolate, strawberry, and vanilla cake layers. This gluten-free Neapolitan cake is made with a single cake batter base and a single buttercream frosting base to easily create each of the three flavors. Celebrate Valentine's Day, birthdays, and any special occasions with this iconic dessert!
Servings 12 slices
Ingredients
- Freeze dried strawberries
- 1 ounce (28 grams) bag of freeze dried strawberries
- Wet ingredients
- 1 cup (200g) granulated sugar (I used organic cane sugar)
- 4 large eggs, at room temperature
- ½ cup (113g) plain whole-milk Greek yogurt
- ⅓ cup (67g) extra virgin olive oil or avocado oil
- 2 teaspoons vanilla extract
- Dry ingredients
- 2 cups (224 grams) fine blanched almond flour
- 1 cup (95 grams) oat flour, gluten free if desired
- 1 teaspoon baking powder
- ½ teaspoon baking soda
- ½ teaspoon kosher salt
- Mix-ins
- 2 tablespoons unsweetened cocoa powder
- 3 tablespoons strawberry powder (from freeze dried strawberries)
- Buttercream
- 1 cup (2 sticks, 226 grams) salted butter
- 2 ½ cups (300 grams) powdered sugar
- ½ teaspoon vanilla extract
- 4 to 6 tablespoons whole milk or heavy cream, divided
- 2 tablespoons unsweetened cocoa powder
- Remaining strawberry powder
Instructions
- Preheat the oven to 350 degrees F. Line the bottom of three 6-inch round cake pans with parchment paper rounds. Spray the parchment paper and sides of the pan with cooking spray to prevent sticking.
- Blend the freeze dried strawberries: In a small, high powered blender, add the freeze dried strawberries and blend on high until they are a fine powder similar to flour, 30 seconds to 1 minute. Set aside.
- Mix the wet ingredients: In a large bowl, whisk together the sugar, eggs, yogurt, oil, and vanilla extract until smooth and well combined, about 1 minute.
- Mix in the dry ingredients: To the bowl with the wet ingredients, add in the almond flour, oat flour, baking powder, baking soda, and salt. Whisk together until smooth and well combined.
- Divide the batter and add mix-ins: Evenly divide the batter into three separate medium bowls by adding approximately 1 heaping cup of batter to each bowl. Add 2 tablespoons of cocoa powder to one of the bowls, and 3 tablespoons of the freeze dried strawberry powder to one of the other bowls (reserve the remaining strawberry powder for the frosting.) Stir the mix-ins into each respective batter with a spatula until well combined and smooth so that you now have one chocolate batter, one strawberry batter and one plain vanilla batter. Please know that if you want the strawberry cake to appear more pink when baked, you’ll need to stir in a few drops of red food dye to the strawberry cake batter (I use natural red food dye).
- Bake the cake: Add each batter to a prepared cake pan, smoothing the top with a spatula. Bake until a tester inserted into the center comes out mostly clean with just a few crumbs attached, 23 to 30 minutes. Cool the cakes completely (you can even make them up to a day ahead, then wrap tightly with plastic wrap and store at room temperature or in the fridge).
- Make the frosting: To an electric stand mixer (or a large bowl if using a hand mixer), add the softened butter and beat on high speed until it lightens in color and is nice and fluffy, 1 to 2 minutes. Scrape the bowl down with a spatula, then add in the powdered sugar and mix on medium low speed for 30 seconds to incorporate the sugar into the butter. Increase the speed to high and beat until mixture is well combined and smooth, 1 minute. Add in vanilla extract and 2 tablespoons of milk and beat again on high, 30 seconds.
- Create the frosting flavors: Divide the frosting into 3 medium bowls by adding approximately ¾ cup of frosting to each bowl. Add 2 tablespoons of cocoa powder and 1 tablespoon milk to one bowl and mix with a spatula until well combined. Add the remaining strawberry powder and 1 tablespoon of milk to another one of the bowls and mix with a spatula until well combined. If any of the frostings are too thick, stir in another tablespoon of milk to create a creamier consistency. The last bowl is the vanilla frosting, which is good to go as is.
- Frost the cake: Spread about 1 tablespoon of the chocolate frosting in the middle of a cake stand on a platter (this will help to anchor the cake). Invert the chocolate cake onto the stand so the flat side of the cakes up. Spread about ⅓ cup of the chocolate buttercream over the chocolate cake spreading all the way to the edges. Next, place the inverted vanilla cake layer on top of the chocolate buttercream and top with about ⅓ cup of vanilla frosting and spread all the way to the edges. Finally place the inverted strawberry cake on top of the vanilla buttercream and add ⅓ cup of frosting, spreading it all the way towards the edges.
- Using an offset spatula, apply a thin layer of frosting around the outside of each cake. Use chocolate buttercream for the chocolate cake, vanilla frosting for the vanilla cake, and strawberry frosting for the strawberry cake. This thin layer of frosting is called your crumb coat, which will allow for a beautiful seamless look once complete. Transfer the cake to the freezer for 10 minutes (or fridge for 20 minutes) to set the crumb coat.
- Once the crumb coat is set, remove cake from the freezer and finish frosting just like you did above with each respective frosting matching each cake. It’s okay if it isn’t perfect! Finally use a bench bench scraper to create a uniform, very thin layer of frosting around the cake. It helps to do this while slowly spinning the cake stand and gently pressing the scraper against the side of the cake. (The frostings will naturally begin to come together where they meet, similar to an ombre cake.)
- To store: Keep slices in an airtight container in the fridge for up to 5 days.
Notes
To make dairy-free: use a dairy-free Greek yogurt in the cake, and dairy-free butter and dairy-free milk in the frosting.