
It’s that time of year again. Time to say welcome you to the wide, wide world of cinnamon roll love. In case you weren’t aware, these cinnamon rolls have been the #1 recipe on Ambitious Kitchen for almost 6 years now!
NEW, and just in time for Easter: I’ve included instructions for making Easter bunny cinnamon rolls! Check out the bottom of the blog post, and watch the video HERE!
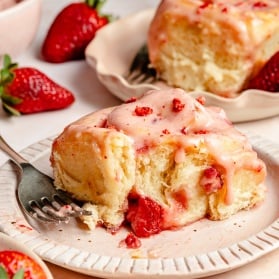
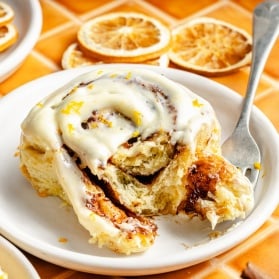
Seriously, say hello to big, fluffy PERFECT cinnamon rolls packed with a cinnamon brown sugar filling and glazed with a vanilla cream cheese glaze that drips into the middle and soaks every single bite.
Descriptive, yes. Delicious, absolutely. Sometimes you need something a little indulgent for moments in your life that require a little something special.
The trick to keeping the cinnamon rolls soft and fluffy is bread flour. Yep, that’s right. The one and only. The rolls really won’t be the same otherwise.
Do I think they could compete with Cinnabon’s famous recipe? 100%. Be sure to read through the WHOLE post where I’ve shared tips & tricks and answered all of your cinnamon roll baking questions!

The story behind this legendary recipe
I first published this recipe back in May of 2017. I had been making this glorious cinnamon roll recipe for years and wanted to share it with all of you.
Years later, these cinnamon rolls are one of the most popular recipes on Ambitious Kitchen, and today I’m bringing them back to remind you of how delicious they are, but also share a few extra tips and tricks, plus a video tutorial of me making them (at the end of the post).
The very first time I baked them up was for Easter brunch while Tony was still in baseball. His parents were in town and he lived with 5 other guys. I prepped the dough the night before, kneading it by hand and mixing the dough with an old wooden spoon. It was perfection. The next morning I popped the rolls in the oven and they rose like cinnamon roll mountains: glorious, beautiful and finished off with a sweet vanilla cream cheese icing. The most beautiful brunch pastry you’d ever see.
The guys dug in immediately and said they were some of the best cinnamon rolls they’d ever had. I knew from that point forward that I’d make this recipe at every special occasion and holiday. Now I make them every Christmas morning for brunch — it’s such a fun tradition and everyone always looks forward to my famous cinnamon rolls.

Ingredients in cinnamon rolls
This cinnamon roll recipe doesn’t require a ton of ingredients, but it does require love, patience, and dedication to the true recipe — meaning don’t deviate from the original! These are called the best cinnamon rolls for a reason, and that requires following the recipe as instructed. Here’s what you’ll need to make the best cinnamon rolls:
- Milk: I recommend 2% or whole milk, but know that almond milk will also work (I’ve tried it!) See my tips below for ensuring your milk is at the right temperature.
- Granulated sugar: this is used to sweeten the cinnamon rolls and to help activate the yeast.
- Quick rise yeast: use quick rise or instant yeast in this recipe to help the cinnamon rolls rise faster. You can also use active dry yeast, but the cinnamon rolls may take slightly longer to rise. Scroll down to get tips for using yeast in this recipe!
- Butter: the one and only. I prefer to use salted butter, but unsalted is great too. You’ll need it for the dough, filling, and icing.
- Egg + egg yolk: this recipe calls for 1 egg and 1 egg yolk for the perfect texture and rich consistency in the dough.
- Bread flour: to help keep these cinnamon rolls soft and fluffy, we’re using bread flour, which has a higher protein level to help lighten the cinnamon roll texture. The higher amounts of protein help to produce more gluten, which gives cinnamon rolls the chewy, soft texture you know and love.
- Brown sugar: personally, I love using dark brown sugar for a more robust molasses sweet flavor in those cinnamon swirls, but light brown sugar will work!
- Cinnamon: a must for these delicious rolls!
- Salt: cinnamon rolls made without salt taste very plain, and in addition, salt also helps to control yeast in cinnamon roll recipes, so don’t skip it.
- For the icing: the icing is truly unforgettable, too! Just cream cheese, butter, powdered sugar, and vanilla.
YES PLEASE. Cinnabon, you’ve got nothing on these rolls.
Can I make them dairy-free?
Yes! As I mentioned, I’ve used almond milk in this cinnamon roll recipe with success. You can also use vegan butter and a vegan cream cheese to make the recipe completely dairy-free.
Looking for a vegan version?
Try my Vegan Banana Bread Cinnamon Rolls, which essentially replace the eggs with mashed banana!

Which yeast is best for cinnamon rolls + how to know when yeast is activated
I can understand why it may be confusing to know if your yeast is activated. First, it’s important to know that there are two types of yeast to choose from:
- Active dry yeast: this type of yeast must be dissolved in liquid, or also what’s known as being “proofed” before it’s added to the rest of the dough ingredients. You’ll know this type of yeast is activated when little bubbles start to appear in the liquid that you dissolve the yeast in (for this recipe, it’s warm milk).
- Instant yeast: also known as quick rise yeast (this is the brand I use and love!), and what we are using for this cinnamon roll recipe. It can be added to the dough without any ‘proofing’ required, so you don’t need to sit and watch the yeast to make sure it bubbles. However, I still like to dissolve it in a little bit of milk and sugar to help get it started.
Regardless of which yeast you’re using, it’s essential that you add it to warm milk that’s between 105 and 115 degrees F. More on this below! You can also add a little sugar with either yeast to help it get activated.
Tips for making the best cinnamon rolls
- Don’t overheat your milk. It should be between 105-115 degrees F. Anything hotter is likely to kill the yeast, which means the cinnamon rolls will not rise. A simple tip is to dip your finger in the milk — it should feel warm, similar to warm bath water, but not HOT. If you warmed it up too much, simply wait a few minutes until it cools down enough to touch.
- Make sure to use room temperature butter for the filling. A lot of recipes call for using melted butter in the filling, but that will cause the filling to leak out before baking. Room temperature butter is best!
- Rub the brown sugar into the butter. After you spread out the softened butter, it’s important to rub the brown sugar into the butter and dough so that it’s well combined. Please refer to the video!
- Use a room temperature eggs in the dough. If you use a cold egg, there’s a chance it could affect the yeast or mix with the melted butter and cause it to coagulate. To bring your eggs to room temperature, simply place them in a bowl of warm water for a few minutes.
- Use bread flour. Bread flour is available at most grocery stores, and it makes ALL the difference in achieving softer, fluffy, perfect cinnamon rolls. JUST TRUST ME.
- Make sure you flour your work surface and the rolling pin. This is to prevent the cinnamon rolls from sticking to the surface or to the rolling pin.

Tools you’ll need to make cinnamon rolls from scratch
Here are some kitchen tools I recommend that will help make this cinnamon roll recipe a success:
- Stand mixer. You’ll want to use the dough hook on your stand mixer to easily knead the dough before rolling it out. Don’t have a stand mixer? No worries! You can also knead the dough by hand.
- Wooden spoon. I recommend mixing your dough together with a wooden spoon.
- Rolling pin. For rolling out that beautiful dough. Pro tip: if you don’t have a rolling pin, you can also flour up a wine bottle!
- Serrated knife. Using a serrated knife will help you cut the cinnamon rolls out after you roll the dough up. You can also use floss.
- 9×9 inch pan. I recommend using a 9×9 inch baking pan so that the cinnamon rolls fit well and bake properly.

Storing tips
Feel free to store your freshly baked cinnamon rolls covered at room temp for 1-2 hours, then transfer them to an airtight container in the refrigerator for up to 5 days. Simply reheat in the microwave to get them soft and gooey again!
How to make overnight cinnamon rolls
- After the first rise, roll the cinnamon rolls up, cut them as directed, and arrange them in a pan lined with parchment paper.
- Cover the pan well with plastic wrap, then place them in the fridge overnight. They can stay in the fridge for up to 18 hours from the time you place them in there — no more!
- When you are ready to bake, bring the cinnamon rolls to room temperature and let them rise for 45 minutes to 1 hour.
- Bake as directed, then frost & devour!
**Please note that in the video, I accidentally say to put the cinnamon rolls in the fridge after the 2nd rise, but you should put them in the fridge after the first rise.

How to freeze cinnamon rolls
- To freeze before baking: the dough should be frozen after the first rise (once they are rolled up with the filling in and cut). Place into a pan and cover well, then place in the freezer. When you are ready to bake, let the dough thaw in the fridge — preferably overnight — then put it in a warm spot for 30 minutes to 1 hour before baking to activate the second rise. Bake cinnamon rolls as directed.
- To freeze after baking: allow the cinnamon rolls to come to room temperature after baking, then you can choose to either freeze the entire pan, making sure they are well wrapped or covered in an airtight container, or you can choose to freeze individual cinnamon rolls. When ready to eat, defrost the cinnamon rolls at room temperature, then warm in the oven at 350 degrees F for 10-15 minutes, or you can warm them up individually in the microwave for 20-30 seconds (once defrosted). I prefer to freeze them before they are iced, and then frost them when ready to eat. The icing is also freezer-friendly!
Your cinnamon roll questions: answered
Be sure to read through the full post for answers to common questions about making cinnamon rolls. A few more common questions that I get:
- Can I use all-purpose flour? The recipe will still work with all-purpose flour (and readers have used it with success), but I highly recommend sticking with bread flour because, as I mentioned, it’s what makes these rolls extra fluffy and delicious.
- Why did the middles pop out of my cinnamon rolls? This can happen if you roll them a bit too tightly or if your pan is too small. Be sure to cut the dough off the ends of your cinnamon roll log as shown in the video below so that the rolls all fit in your pan.
- Can I double the recipe? Yep! Just remember to use a larger pan.
- What can I do if my dough is too sticky while kneading? Simply add a little more flour, about a tablespoon at a time, until it’s easier to work with.
- Can I use a bread maker? I haven’t tested this recipe using a bread maker, but readers in the comments have done so with success!
- Can I add mix-ins to the filling? You bet! I think chopped nuts, raisins, or even other spices like pumpkin pie spice would be delicious.
- How far in advance can I make them? If you use the overnight method (as described above), the rolls can sit in the fridge for up to 18 hours before baking. Otherwise, feel free to make them further in advance and freeze them — instructions also included above in the blog post!
More brunch treats you’ll love
- Upside-Down Bananas Foster French Toast Bake
- The Best Pumpkin Cinnamon Rolls You’ll Ever Eat
- Brown Butter Apple Coffee Cake
- Healthy Gingerbread Loaf
- Vanilla Brown Butter Pear Baked Oatmeal
- Espresso Yogurt Chocolate Chip Coffee Cake
Get all of our delicious breakfast & brunch recipes here!
BONUS: make cinnamon roll bunnies for Easter
Turn these rolls into the cutest Easter bunnies! Watch me make them HERE, and follow these instructions:
- After the first rise (Step 4 in the recipe), roll out the dough as directed.
- Spread with the butter and cinnamon sugar mixture, then cut the dough into 12 strips with a pizza cutter and roll up as directed in the video.
- Cover with a towel to let rise again for 30 mins while you preheat the oven.
- Bake as directed in the recipe! I top mine with cream cheese frosting and candy eyes + sprinkles.
I hope you get a chance to try out this cinnamon roll recipe! They are truly a family favorite. Make them, keep them in your family for generations to come, and share a sweet surprise with someone special in your life. Don’t forget to rate the recipe below!
Ambitious Kitchen
Cookbook
125 Ridiculously Good For You, Sometimes Indulgent, and Absolutely Never Boring Recipes for Every Meal of the Day
The Best Cinnamon Rolls You'll Ever Eat

Ingredients
- DOUGH
- ¾ cup (180 grams) milk (whole milk or 2% preferred)
- 2 ¼ teaspoons (one ¼-ounce package) quick-rise (instant) or active dry yeast*
- ¼ cup (50 grams) granulated sugar
- 4 tablespoons (57 grams) salted butter, melted and cooled
- 1 large egg plus 1 large egg yolk, at room temperature
- 3 cups (360 grams) bread flour, plus more as needed
- ¾ teaspoon kosher salt
- Extra-virgin olive oil, for greasing the bowl
- FILLING
- 4 tablespoons (57 grams) salted butter, softened
- ⅔ cup (142 grams) packed dark brown sugar
- 1 ½ tablespoons ground cinnamon
- CREAM CHEESE FROSTING
- 4 oz (112 grams) cream cheese, softened
- ¾ cup (85 grams) powdered sugar
- 3 tablespoons salted butter, softened
- ½ teaspoon vanilla extract
Instructions
- Prepare the dough: In a small microwave-safe bowl, warm the milk by microwaving it for 45 seconds to 1 minute, until it registers 115°F on a thermometer and feels like warm bath water.
- Place the warmed milk in the bowl of a stand mixer fitted with the paddle attachment and sprinkle the yeast on top. (If using active dry yeast, add the sugar now and let the yeast sit with the sugar until foamy, about 5 minutes.) If you haven’t already, add the sugar, then the melted butter, egg, and egg yolk. Mix on medium speed until well combined, 30 seconds. (Alternatively, mix with a wooden spoon until well combined.) Remove the bowl from the mixer and use a wooden spoon to stir in the flour and salt until a dough begins to form (this will prevent flour from flying everywhere!).
- Knead the dough: Place the dough hook on the stand mixer and return the bowl to the mixer. Mix the dough on medium speed until it comes together and feels soft and slightly sticky, 8 to 10 minutes. If it’s too sticky—meaning it’s sticking to the bottom of the mixer—add another 1 to 3 tablespoons bread flour, 1 tablespoon at a time. (Alternatively, you can use your hands to knead the dough for 8 to 10 minutes on a well-floured surface.) Meanwhile, place a clean dish towel in your dryer to warm.
- Lightly grease a large bowl with olive oil. Transfer the dough ball to the bowl, then cover with plastic wrap and the warm towel. Allow the dough to rise until doubled in size, 1 to 1½ hours. (This may be more or less time depending on the time of year, the humidity, and the temperature in your home.) You will know the dough has risen enough when you poke your finger into the dough about an inch without the indentation bouncing back immediately.
- Generously dust a surface with flour. Turn out the dough and use a rolling pin to roll the dough into an 10 × 14-inch rectangle.
- Prepare the filling: Spread the softened butter over the dough, leaving a ¼-inch margin at the far short side of the rectangle. In a small bowl, mix together the brown sugar and cinnamon. Use your hands to sprinkle the mixture over the butter, then gently rub the brown sugar mixture into the butter.
- Starting from the short side without the margin, very tightly roll up the dough. Seal the far edge of the dough as best you can by pinching the dough together just slightly, then make sure the dough log is seam-side down. Cut a ½ inch off the ends of the dough, as the ends won’t have enough filling; feel free to discard (or bake separately as yummy extras). Use your hands to give the dough log a gentle push inwards on both ends so that it compacts slightly, as it may have stretched out a bit during the rolling process.
- Using unflavored dental floss or a serrated knife, cut the dough into nine 1-inch slices.
- Line a 9x9-inch or 11x7-inch pan with parchment paper. Place the rolls in the prepared baking pan. Cover with plastic wrap and a towel and let rise again until the rolls have puffed up, are doubled in size, and touching each other in the pan, 45 minutes to 1 hour.
- Meanwhile, preheat the oven to 350°F.
- Bake the cinnamon rolls: Once the rolls have risen, remove the plastic wrap and towel and bake until golden brown on the edges, 20 to 25 minutes. Not overbaking the rolls ensures that they will stay soft in the middle. Cool for 10 minutes.
- Prepare the cream cheese frosting: In the bowl of a stand mixer fitted with the whisk attachment, combine the cream cheese, powdered sugar, butter, and vanilla. Beat on low speed for 30 seconds, then increase to medium-high speed until smooth and fluffy, 1 to 2 minutes. (Alternatively, whisk the frosting by hand.) Spread the frosting over the warm rolls and serve.
- To store: Cover the whole pan with plastic wrap and foil or place individual cinnamon rolls in airtight containers or silicone bags and store in the fridge for up to 5 days. Reheat the cinnamon rolls individually in the microwave in 15 second intervals until warm.
Recipe Notes
After placing rolls into the greased pan (after the first rise), simply cover, place overnight in the fridge and then bake them in the morning as directed. I like to bring my cinnamon rolls to room temperature first by leaving them on the counter for 30-45 minutes before baking (this is known as the second rise). Make Easter bunny cinnamon rolls: check out the bottom of the blog post, and watch the video HERE! Check the blog post for instructions on how to freeze cinnamon rolls, plus additional tips, tricks and FAQs!
Recipe by: Monique Volz // Ambitious Kitchen Photography: Sarah Fennel
This post was originally published in May 2017, republished in November 2021, republished in December 2022, republished December 8th, 2024, and republished November 15th, 2025.


??? 1 large egg and 1 egg yolk?? Is that 2 eggs??
Amazing recipe!! Due to the heat where I live, I decided to try air frying these and it worked perfectly! For my Ninja, I air fried at 325 (preheated) for 8 minutes. I just put the rolls on parchment (5 at a time) and placed them on the air fryer tray. Suggest not opening to for at least the first 5 minutes. Thanks again for this great recipe!
Love your recipe but man is this page hard to follow when baking! You should tweak it for instructions & temperatures all in one place! Other than that recipe is great but little so hard to sit and scroll through when baking
This is my go-to recipe for any family occasion. They are so soft and yummy and it definitely leaves people impressed!
Question: can I freeze the dough ball after the first rise, then thaw it and make the rolls there? I want to make them at a family house, but am traveling and can bring them in the pan already, but want the dough ready to go.
So glad you love them! Check out the “how to freeze” section of the blog post – you can freeze them before or after baking 🙂
Oh sorry, I mean I cannot travel with them premade and ready. Can I freeze the dough and then take it out and make the rolls after?
I have made these and the pumpkin cinnamon rolls COUNTLESS times and without fail come out perfect. People told me they are the best cinnamon rolls they’ve ever had! The dough is the best I have had. I had multiple at restaurants and truthfully they don’t even compare to these!
Truly the best!!
This recipe is definitely a keeper! I made 6 batches in one go—4 with the original filling and 2 with apples, cinnamon, and raisins. Both versions were absolutely delicious and disappeared in no time. I didn’t make the frosting since I’m not really a frosting fan. Instead, I brushed the rolls with a mixture of egg and a little whipping cream before baking, then brushed them with simple syrup while they were still hot from the oven. They came out beautifully golden, soft, and shiny. Not a single roll survived, which is probably the best review a recipe can get. I’ll definitely be making these again!
Amazing! So glad they’re a favorite!
these cinnamon buns are absolutely perfect- fluffy, soft, easy to make. the filling is so scrumptious and the dough is delicious!
So glad you loved them!
Oh my goodness- this is truly the best common rolls I’ve made and it does go neck to neck with Cinnabon! No exaggeration. Fluffy and chewy with the right amount of sugary goodness! Thank you for the recipe! Makes baking very enjoyable.
So happy to hear that!
In the process of making these right now! They just came out and are cooling! I’ve never used bread flour for cinnamon rolls before but goodness do these look divine!! Making them for the hubby to take to work for all his friends and co workers! I doubled the recipe! Cant wait to try them!! Thank you for the recipe! This may be my new go to! 🙂
Just an update!!! These are the best EVER!!!! I added extra filling but omg they are heaven, best ive ever made and cant wait for my mans buddies to have them as a treat tomorrow! Thank you!!!
Amazing!! So happy these turned out beautifully!
These are the best cinnamon rolls Ive made so far!! I followed another recipe but they didn’t turn out as soft & fluffy. I’m guessing it’s the eggs that make them so soft. I’m definitely using this recipe every time I make them.
So glad you loved them!!
They were okay, I followed the recipe exactly but they turned out kind of heavy and dense. They weren’t as fluffy and light as the recipe said they would be. The only thing I changed was the amount of powdered sugar in the icing because I like it less sweet and more of a cream cheese taste but that’s the only variation I did. They’re fine, even a bad cinnamon bun is a good one but I’m really disappointed they didn’t turn out better. I don’t know what I could have changed. I just don’t think I’ll make these again.
So strange! If they were dense, it sounds like there was too much flour. Did you weigh your ingredients?
Made these today! Great recipe and instructions. Thank you for sharing
So glad you enjoyed!
I just made these today…. HOLY COW!!! Best cinnamon rolls I’ve ever had in my entire life. I made them exactly as the recipe says- the only difference is I drizzled heavy whipping cream on top of each of the rolls just before putting them in the oven. I topped them with the icing in the recipe and then had toasted pecans on top drizzled with homemade caramel sauce- WAY BETTER than Cinnabon. I took them out of the oven less than 2 hours ago and the ENTIRE pan is gone…. The time and effort put into these is definitely worth it. Next I’m I’ll be sure to do a double batch- maybe triple!!
That sounds amazing!! So glad you loved them!
I use this recipe for everything. My customers love it!
Glad these are a hit!
Really good 😊
Glad you enjoyed!
Absolutely loved this cinnamon roll recipe — the rolls look incredibly soft, fluffy, and perfectly gooey with that rich cream cheese glaze. I really appreciate how detailed the instructions are, especially the tips for achieving bakery-style texture at home. Recipes like this are perfect for home bakers who want consistent, indulgent results, just like Sai Chanduram’s Bakery focuses on delivering fresh, rich-flavored, and high-quality baked treats for every customer
I have made these before and everyone loves them. The last 2 times I made them, the dough is so dry. I follow it exactly, I read and reread the instructions. What could I be doing wrong.
I’m not sure! Nothing has changed in the recipe. Sorry to hear you are having trouble. Is your yeast fresh? And are you weighing your ingredients?
These actually were the best cinnamon rolls I have made. Even with all purpose flour, it came out super soft and fluffy. I highly recommend, really good recipe and not too sweet.
So glad you loved them!!
These are so amazing. I followed the recipe pretty closely; maybe an extra splash of vanilla.
Perfect! So glad you enjoyed 🙂
These have come out perfect every time ive made them! Great recipe. My husband asked me to make a batch for his work crew, which is at least 12 people. Have you ever made a double batch in a larger baking dish? I’m wondering if the middle rolls would get baked enough before the outer rolls start to get over baked. Thanks in advance for your advice!
So happy to hear that! I typically make one batch at a time, but you can absolutely double these in a large baking dish.
I’ve made your pumpkin cinnamon rolls and they turned out amazing but when I try this recipe the dough comes out very dense and crumbly and doesn’t rise. What am I doing wrong??
Hmm you should definitely weigh your ingredients for best results. If they are coming out dry that tells me that perhaps you might be accidentally packing your flour in?
Very delicious and tasty, it really does beat cinnabon!
Absolutely! Glad you enjoyed!
Delicious. Followed recipe exactly and these are perfect
So happy to hear that!
Ive been making your recipe for years now with excellent results, however, I wonder if trying the Tangzhong method would improve further. Have you tried it. Anyway, theyre good as they are but just a thought 🙂
So happy to hear that! I haven’t tried it, but let me know if you do!
I did modify your recipe to include the Tangzhong method. It alters the texture of your recipe toward a more milk-bread texture, which I enjoyed. It also caused the rolls to turn about double in size when not using it. Lastly, it helped with shelf-stability and texture when stored unfrosted at room temp. For those interested, I used the following guide to help me do the modification:
https://www.kingarthurbaking.com/blog/2018/07/23/how-to-convert-a-bread-recipe-to-tangzhong
For tangzhong-based yeast dough, you want a hydration level of 75%. To achieve the above with a total of 360g bread flour, this means we need about 255g whole milk, 1 large egg, and 57g salted butter. This accounts for the water content coming from these key ingredients. The original recipe only had 180g of whole milk, so to achieve this, I added 75g of additional whole milk.
For the Tangzhong portion I used:
3 tbsp (23g) bread flour
½ (113g) cup whole milk
Then, for the remaining dough base, I used:
142g whole milk
2 ¼ teaspoons (one ¼-ounce package) quick-rise (instant) or active dry yeast*
¼ cup (50g) granulated sugar
4 tbsp (57g) salted butter, melted and cooled
1 large egg plus 1 large egg yolk, at room temperature
337g bread flour, plus more as needed
¾ tsp kosher salt
I would consider more filling to help compensate for the larger rolls to maintain the flavor balance.
Perfect! I’m glad that worked out well!
Jesus I just wanted the recipe not your life story
Feel free to click the “Jump to Recipe” button to get straight to the recipe itself 🙂 Besides the intro, the entire blog post is filled with tips, tricks, and answers to common questions so that people can bake these with success.